Thursday, 26 December 2019

How to get ready for the 2063 annular solar eclipse


This morning at about 10am, George alerted me to the fact that the annular solar eclipse of our lifetime was going to be upon us presently, at 1.22pm-1.24pm SGT (Singapore Time). The next one is in 2063 and I would either be 79 years old or dead by then (cue the crying from baby Beano when she finds out that Mummies and Daddies don't live forever), so I decided that I would quickly set up a safe viewing board for Beano (and the adults).


Here's a diagram of my hacky setup...

A pinhole camera is doable but the output would be very dim and hard for a baby to see. Probably hard for adults to see too. So I decided to get some binoculars and build a simple projector with actual lenses. Benefits of living 5min from Mustafa is that I can waltz up to it at 11am and say to the man at the counter: "hello which is the best sub-$100 binoculars that you recommend???" And then go back with my awesome new binoculars and make a hacky job with some cardboard and tape, and get to a nearby hdb carpark rooftop by 1pm...

My top tip for people trying to build this in 2063 is to dispense with the tripod entirely and just hold it in your hands and lap as follows because ITS HARD TO FOCUS ON THE SUN IF YOU DON'T ACTUALLY LOOK AT IT.

I missed getting the ring moment on camera but I think got a pretty good view (and extremely safe view) of the eclipse anyway. I also pointed my preview camera at it and later when I looked I saw some refraction from the eclipse in my picture.


I don't think baby was very impressed by it (possibly because she does not yet know what is SUN or MOON or SHADOW, etc) but now I have a great pair of binoculars with which to spend hours looking at the strange things people do on the streets of Jalan Besar / Little India when they think they are not being looked at...

Friday, 20 December 2019

Playing around with Jupyter Notebook, Sketch RNN & Neural Style Transfer


This week as part of my work I went to a 2-day crash course in Tensorflow for NLP, which is admittedly ridiculous because (a) 2-days? what can one accomplish in 2 days? would we not be better off slowly studying ML via a mooc on our phones? or the Google Machine Learning Crash Course? and the official Tensorflow tutorials? (b) I am struggling with both the practical side (I have absolutely no maths foundation) and theorectical side (I don't even understand regression models, but, I mean, do I need to understand regression models anyway?)

Which then begs the question: DO I REALLY NEED TO PEEK INSIDE THE BLACK BOX IN MY LINE OF WORK?

Or, WHAT IS MY LINE OF WORK ANYWAY? And how much technical understanding do I really need to have?

Now I obviously don't feel like I'm in any position to design the innards of the black box myself, but I'd like to be the person who gathers up all the inputs, preprocesses it, and stuffs it through the black box myself, so as to obtain an interesting and meaningful output (basically I'm more interested in the problem framing). But existential crises aside, this post is to gather up all my thoughts, outputs (ironically unrelated to the course I was at, but this is a personal blog anyway), and relevant links for the time being (pfftshaw, with the rate at which things are going they'll probably be outdated by 2020...)

Jupyter Notebook


Jupyter Notebook is the wiki I wish I always had! Usually when working in Python you're always in the shell or editor and I make my wiki notes in a linear fashion to recount the story of what I was doing (in case I want to revisit my work at a later point). For the purposes of learning I find it most useful to think of it as a linear narrative.

Jupyter is the new shell where you can do precisely that - write a linear narrative of what you think you were doing - alongside the cells of your code that you run. Its generally quite easy to set up Jupyter notebook via Anaconda which will install both Python and Jupyter Notebook and then you can paste the link from terminal into your browser.


I could have embedded my notebooks instead of screenshotting it but I ain't gonna share my notebooks cos these are just silly "HELLO WORLD" type tings...

Let's say you don't want to run it on local environment. That's fine too because you can use the cloud version - Google Colab. You can work on the cloud, upload files and load files in from Google Drive. You can work on it at home with one computer and then go into the office and work on it with another computer and a different OS. You can write in Markdown and format equations using LaTeX.

As an interactive notebook there are so many opportunities for storytelling and documentation with Jupyter Notebook. And if you like things to be pretty, you can style both the notebook itself or style the outputs with css.

Sketch RNN


I followed the Sketch RNN tutorial on Google Colab to produce the following Bus turning into a Cat...


Love the Quick Draw project because it is so much like the story I often tell about how I used to quiz people about what they thought a scallop looked like because I realised many Singaporeans think that it is a cake instead of a shellfish with a "scalloped edge shell".

I love the shonky-ness of the drawings and I kinda wanna make my own data set to add to it, and perhaps the shonky-ness is something I can amplify with my extremely shonky usb drawing robot which could use the vector data to make some ultra shonky drawings in the flesh.

Now that I have accidentally wrote the word shonky so many times I feel I should define what I mean: "shonky" means that the output is of dubious quality, and for me the term also has a certain comedic impact, like an Eraserhead baby moment which ends in nervous laughter. (Another word I like to use interchangeably with "shonky" is the Malay word "koyak" which I also imagine to have comedic impact)


Eg: When Tree Trunks explodes unexpectedly...

Neural Style Transfer


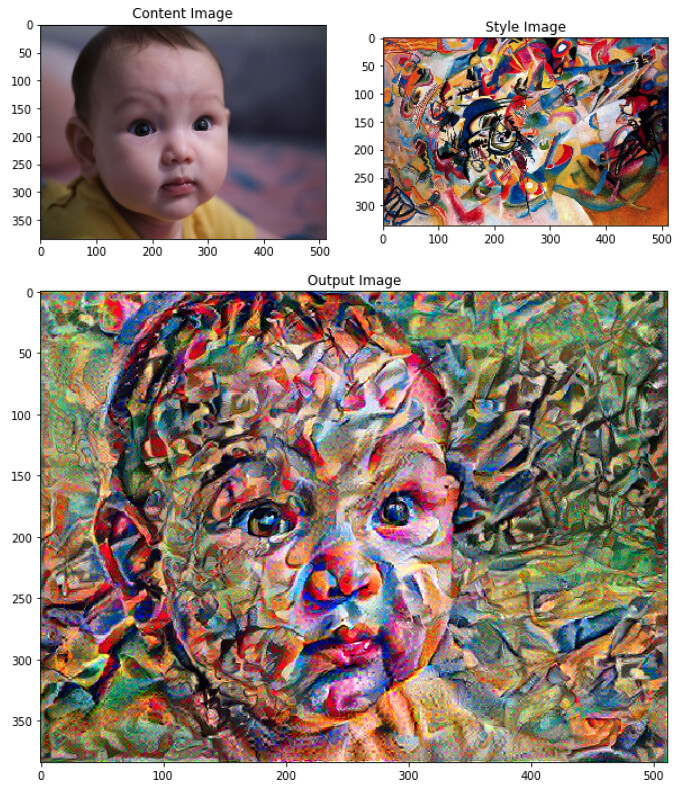
I followed the Neural Style Transfer using tensorflow and keras tutorial on Google Colab to produce the following:

Beano x Hokusai
Neural Style Transfer with Eager Execution - Colab3

Beano x Van Gogh's Starry Night
Neural Style Transfer with Eager Execution - Colab4

Beano x Kandinsky
Neural Style Transfer with Eager Execution - Colab5

Beano x Ghost in the Shell
Copy of Neural Style Transfer with Eager Execution gots

Beano x Haring
Copy of Neural Style Transfer with Eager Execution_haring

Beano x Tiger
Copy of Neural Style Transfer with Eager Execution_tiger

Beano x Klee
Copy of Neural Style Transfer with Eager Execution

How does this work? In the paper it describes how you can try to find out what is the style of an image by including feature correlations of multiple layers in order to obtain a multi-scale representation of the original input image, thus capturing its texture information but not the global arrangement. The higher levels capture the high-level content in terms of objects and their arrangement in the input image but do not constrain the exact pixel values of the reconstruction.


Image Source: "A Neural Algorithm of Artistic Style" by Leon A. Gatys, Alexander S. Ecker, Matthias Bethge

Saturday, 7 December 2019

The Library of Pulau Saigon in "2219: Futures Imagined": Animated GIF Workflow


The Library of Pulau Saigon, Now at 2219: Futures Imagined (ArtScience Museum)

Over the years I've often told a story about an apocryphal encounter I had with a certain glass case full of items from Pulau Saigon at the ArtScience Museum, back in 2011...

Back then as a designer, I had been working on some interactive educational games for the education team at ArtScience Museum, and I had an opportunity to also show my own interactive artwork about the Singapore River - in a large cavernous space at the end of the huge Titanic show - a section about Singapore during the time of the Titanic. I was very much delighted to be able to show a work about the Singapore River next to some actual artefacts dug up from the Singapore River (loaned by Prof John Miksic). At the time I knew very little of the history of the islet - except the fact that, well.. not very much was known about it, and that it was plainly visible in some portions of my interactive (which had been based on old maps of the Singapore River).

I don't really know what I should have expected, but the items were much tinier than I had imagined them when Angeline first told me about them. I recall feeling somewhat underwhelmed by its scale; they were entirely dwarfed by the space. I remember being somewhat confused by the label; and even though they were not my things, I began to feel worried that people would not understand them, or want to understand them. Audiences today have so much media fighting for their attention - they want to be entertained by easily consumable chunks of entertainment; right before this there was the spectacle of the TITANIC! TITANIC! READ ALL ABOUT IT! Could we really get audience to spend time and energy contemplating and thinking about this poky little vitrine full of tiny, rough, broken, complex things which might take more time to understand?

Anyway, I thought about how I used to obsessively photograph everything even back then. So why had I never searched in my own archives for photos of this purported vitrine that I saw in 2011? So I went back into my photo archives and... successfully dug up these photos!
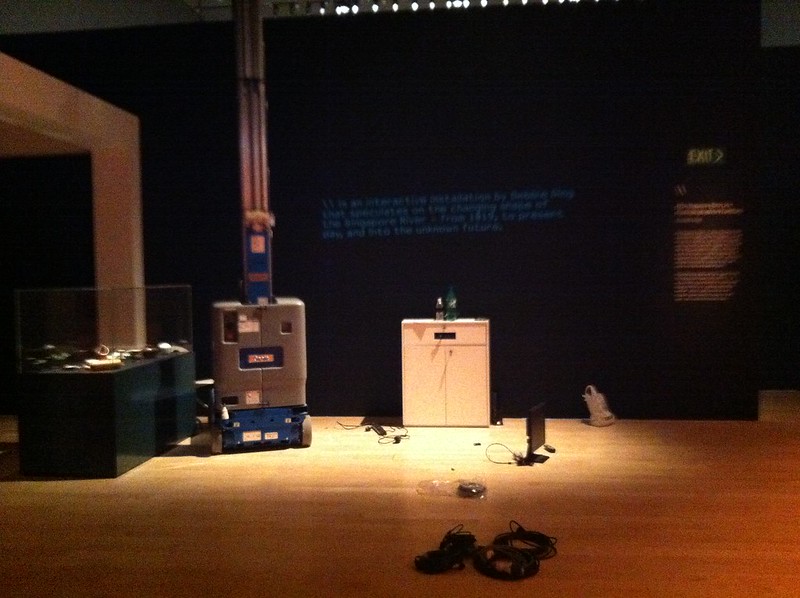
IMG_1439

BACK IN 2011: NOTE THE GLASS CASE ON THE LEFT OF THIS IMAGE!!!


IMG_1444

BACK IN 2011: Pulau Saigon Artefacts at the ArtScience Museum


Part of my desire to make "The Library of Pulau Saigon" stemmed from that encounter with that problematic vitrine. So it feels quite fitting that a copy of this work is finally making an appearance at ArtScience Museum - in the new "2219: Futures Imagined" exhibition.

In terms of how the work is made, I've always been surprised how far hand waving gets you. The truth of the matter is that models are made from sampling Google Images and me finding individual (and sometimes different) methods to reproduce those objects in 3d by writing Openscad scripts to generate models. Some were straightforward like just producing svg outlines of objects and transforming them into 3D but others involved more... er.... creative coding. As an artist I might like to say that its the machine helping me along in the creative craftsmanship of the object, but actually I'm in the back hitting the computer with a big stick shouting "COMPILE, DAMMIT, JUST COMPILE MY CRAPPY CODE!"

This time around I decided I also wanted to generate lots of gifs showing the process in order to supplement the existing physical work which I got onemakergroup to help me reprint. Why didn't I do this earlier? It seems people are always drawn to the screenshots of my openscad files for this, although frankly speaking if you are a techie person then you will quickly see that a LOT of intervention has gone into the making of the objects (whilst I'm cheeky enough to say that its an unforgetting machine that is making it, to a great extent the hand and the subjectivity of Debbie the artist is obviously written over all the objects)...


THE GIF FACTORY


Since I did my project in 2015, Openscad has since gotten many more features including an "animate" feature - except that what it does is to render out frame by frame and you still have to compile everything together by yourself, so in the interests of time this wasn't the method I wanted to use. (But if you did want to use Openscad to generate frames that you could compile into an animation, you can look at the default example within Openscad. You just have to create a value $t and then to start the animation, select View > Animate and enter some values into "FPS" and "Steps", like this below)


Step 1: Automatically open and resize application window to specific size and position

First I figured out how to write an Applescript to resize windows so I can screen-capture them quickly. The following Applescript uses assistive access to resize and reposition the window of any app - including 'unscriptable' apps - but you'll need to allow Script Editor to control your computer in System Preferences. You can change the numbers to fit the size you require. In my case I wanted to screencap it at 1024 x 768 but for some reason my screenshot app Monosnap does not start the capture at 0,0 so I adjusted it to fit (pixel by pixel). I also only wanted the app's content so I added 2px to height and width.

Applescript to resize app window and set position:
set resizeApp to "OpenSCAD"
set appHeight to 770
set appWidth to 1026

tell application "Finder"
 set screenResolution to bounds of window of desktop
end tell

tell application resizeApp
 activate
 reopen
end tell

tell application "System Events"
 tell process resizeApp
  set the size of front window to {appWidth, appHeight}
  set the position of front window to {5, 0}
 end tell
end tell

Step 2: Screen video


I just used Monosnap (Free, Mac/Win) for this.

Step 3: Convert mp4 to animated gif


To convert the mp4 files into animated gifs, I used Gif Brewery 3 (Free, Mac). What is it about the palindrome loop (boomerang) that works so well?

Anyway I'm glad to have worked out a faster workflow for creating gifs quickly and maybe next time every other image I upload to my blog or website ought to be an animated gif!!!