Sunday, 23 February 2020

The Kappa's Izakaya: 360° Illustration Process


Recently I worked on a 360° illustration of an Izakaya in Daryl Qilin Yam's Kappa Quartet and I was asked if I could share a bit more about the process of doing such an illustration.

Artistic disclaimer: It just so happened that I watched a lot of Midnight Diner at the time when I was doing this illustration, so those spaces were definitely in my mind's eye. There was also the show Samurai Gourmet which was a bit tiresome to watch, but had a few good shots of a traditional izakaya too. Alas, although I have visited Tokyo several times before, at this point I haven't really been to a bar or izakaya in some years now...


From "Midnight Diner: Tokyo Stories"


From "Samurai Gourmet"

Some things I realised from these portraits of izakayas is that when in doubt on how to fill the bar space, you can put stacks of tiny crockery or cover it up with a cupboard!


I even made a little crackleware... not that the detail is visible in the final render

Another disclaimer: Where 3D modelling is concerned, I mainly design spaces and architectural/interior renders and I'm not a character designer! This will probably be apparent to people who actually do proper animation / character design because here I chose to render all the other people in the scene in this weird white low-poly form. Personally I thought it a good fix for my weakness and also that it kinda worked for this 'horror' piece...

Initially I thought that I would actually try to do the entire drawing by hand because I have actually enjoyed doing similar illustrations entirely by hand in the past - especially with lens distorsion like this:


2 illustrations from the set of 4 that I was commissioned to do for the Commuting Reader

I usually work out a lot of the alignment for this kind of illustration by doing a 3d model using a fisheye or panoramic lens. After arranging white blocks in the space and rendering it out, I just use those lines in the render as perspective reference for my drawing.


Example: this plain equirectangular render with no materials...

And for all other details that you need to fill in by hand, you can rely on an equirectangular grid (here is a link to an equirectangular grid by David Swart that you can use as a template) and think of it as a 4 point perspective drawing as so:


Here's a 4 hour sketch I made using the grid for the fun of it in 2018...
(Back when I had a lot of free time huh)


Problem right now is that feeding and caring for Beano made it extraordinarily difficult for me to be able to use the tablet or cintiq. If left to her own devices, she wants to pull on all the type-c cables and gnaw on my stylus and then slap my cintiq screen! Attempts to set up my workstation in the bedroom so I can use the cintiq when she's asleep have failed in baby safety. In fact I've more or less resigned myself to the fact that spending time with the tablet is impossible now - WHO WANTS TO BUY A MEDIUM WACOM AND/OR A CINTIQ PRO IN EXCELLENT CONDITION??? - and I've had to streamline my time spent designing, thinking of the fastest way to get the visual output. Hours spent doing digital painting like in the old days? Not happening anymore. A blender render is all I can muster now, which is great because whilst I feed and entertain Beano, I can easily set a render going so that I feel as if my illustration is partly doing itself whilst I'm busy...


I also use a renderfarm to speed things up a bit and I usually do a smaller resolution render to check that things are alright before doing the full size. At the 50% of the resolution I wanted it cost about 40-60 US cents (0.85 SGD) for each one. For the final render at 100% resolution and twice the samples, it cost about 4 USD (5.60 SGD).


I don't know how most people do the next step but I usually go through a process of annotating my renders and then ticking them off in Monosnap through as I do the edits:


Finally we end up with the base render onto which I can add faces and other details in Photoshop. I do find that adding a bit of noise (0.5%-2%) also helps make it more 'painterly' because when the render is too sharp it becomes a bit disconcerting and unreal. I also drop the file periodically into this equirectangular viewer to see if the work is shaping up correctly - usually common issues might include (1) some things in the image that seemed further away may suddenly seem extremely close to the camera view or (2) items may be blocked when you render the specific view - so some time needs to be spent finetuning the arrangement.


Render Breakdown

This was another work made possible by the Dingparents who came down to take care of Beano on the weekends so I could continue my artistic pursuits! I am grateful to have the time to continue to make my work.


Come see the final image at Textures: A Weekend of Words, at Sorta Scary Singapore Stories by Tusitala.


13 - 22 Mar
10am – 10pm
The Arts House

Textures: A Weekend of Words celebrates Singapore literature and its diverse community. No longer a solitary experience, reading becomes a shared adventure through performances, installations, and workshops that will take you on a trip through the literary worlds of local authors.

The third edition of the festival takes on the theme “These Storied Walls”. Inspired by The Arts House’s many identities as a Scotsman’s planned estate, our nation’s first parliament, and now Singapore’s literary arts centre, the walls of The Arts House have been etched with the stories of those who have walked these halls.

This year’s programming features more installations and participatory activities that invite you to go a step further — move a bit closer and look a little longer. As you discover undiscovered narratives of your own, join those who have come before and weave your story into the tapestry of The Arts House.

Textures is co-commissioned by The Arts House and #BuySingLit, and supported by National Arts Council

More about Sorta Scary Singapore Stories

Saturday, 22 February 2020

Paintpusher: Computer-aided Oil Painting (SUPER–TRAJECTORY: Life in Motion, ArtScience Galleries, 20 February to 8 March 2020)


Behold! This is a painting made by me and a little XY plotter which pushes the paint around. (I originally gave it a title with the word "sketches" in it because I like how it starts from a pencil sketch, to a processing sketch, then to this plotter's wonky sketch that pushes paint around on the canvas... but now thinking about it, I am actually thinking I should rename the work to "Paintpusher" because it is not really painting, it is really just pushing the oil paint around on the canvas...)

Every once in a while I get gripped by a desire to teach myself how to paint hyperrealistic or photorealistic -- just for the hell of it and being able to master it...? - but then I realise it will take me years of muddling along in the good old fashioned, humans-doing-oil-paintings-by-hand sort of way. Additionally, my own approach for understanding and making visual work has always been via the digital, so instead of mucking around helplessly in oils, I thought I would try to do a little "computer-aided oil painting"...

Doing 'precision' painting of any sort is messy and potentially very time-consuming, and now with a Bean to feed and care for (practically a 24hr job), carving out time to make art has been much more challenging (in addition to my teaching day job). Whilst spending long hours breastfeeding Beano, I had quite a lot of time to plot and scheme up things, but I only had rigidly fixed windows of time where I could personally execute the program (ie: when my parents were available to take care of Beano on the weekends). In theory, I thought that by devising a process for making the 'precise' paintings (and sticking to the process!) it would help me control the amount of time I was spending on "Debbiework"... although the prep work takes the longest in that case. This painting experiment would not have been possible without my parents coming down over a few weekends to help care for Beano whilst I made a big painterly mess.


The Mini Line-Drawing Machine

Line-Us Concept Image

Some time back there was a kickstarter for a little drawing machine called the Line-Us, which they rather pointedly emphasised on their promotional material as being "NOT A TOY". Well then, what is it exactly? I guess it is a small usb powered plotter in which you can insert a pen and have it trace out an SVG file (you can also muck around by hand on their app and see how it partially messes up your drawing. There was also a concept gif they released, imagining it doing water colours.


Line-us plotting some random SVG that I made in Illustrator

The app that comes bundled with the Line-us allows you to draw on your mobile screen to control the Line-us. IT allows you to take a photo, put it in the background, and then you can trace over the image your self. Which ultimately produces something which is not dissimilar to something you might choose to draw with your non-dominant hand.

I've got to say that drawing on my phone to control Line-us's pen doesn't really seem like the point of having a device like this. I mean it makes for hilarious results from this NON-TOY, but it makes more sense as a SVG plotter, which I'm surprised isn't the function of its main app. Maybe they dont want to get your hopes up of it being able to plot perfect squares and perfect circles... BECAUSE IT DOESN'T. I used this script contributed by another user (Set the IP to 192.168.4.1 and it will connect the Line-US when in red mode)

The joy of the plotter is really in its "shonky-ness". It gets more and more askew as we progress further away on both axes. It wobbles and trembles and if your pen is tilted on an angle, the distortion from the tilt will become more and more pronounced at the extremes of the drawing board. One of the prominent apps touted for this "NOT-A-TOY" is a game where it will draw something (somewhat badly) and you have to guess what the Line-Us is trying to draw...

Painting Process


Initial Sketches

I started with some sketches of possible approaches. I had lofty dreams of doing a landscape painting at first, but in reality I don't have that much control (or rather it feels like youre in a constant state of almost losing control of the pen), and I found that with this kind of work, less is more. The more you push paint around, the more it looks like an indistinct mushy grey. Like if you smeared your face over a palette.


Line-us Manual Control - painted too long until paint became muddy

This is the mess it makes when you "overpush" the paint (output now discarded). Using manual control on the app meant that it was no different from me being an exceptionally incompetent painter. The process needs to be rigorously followed for this experiment to be meaningful, and I knew by this point that I wanted to make iterative paintings...


Processing Sketch

Referring to some of my pencil sketches, I wrote a Processing sketch to produce the drawing. I had more intentional and complex sketches at first, but as you can see, I ended up with something exceedingly basic. A super basic bezier. To be honest, everything more complicated just didn't make a good painting.

In Processing, you can use beginRecord to echo the drawing processes to a svg or pdf file. It generates an SVG file which comprises of the lines I drew with the code...


SVG Generated in Processing

And the SVG file is also readable by the plotter as a series of lines of coordinates which when joined up make the drawing.


The plotter outputs look a bit wonky, but the wonky-ness is consistent. If you made the Line-Us repeat the SVG, it would always outline over that same point, over and over again. So... it is very precisely inaccurate.


After testing out all the outputs, I prepared the canvas by using a palette knife to lay down a base colour that the plotter would paint over. I also experimented with using masking tape to mask out the area where I would be painting - I think the framing was crucial to the work looking as it does; without the framing, it just felt like a big messy paint blob; similarly without repetition one may not realise this is an iterative work or a work produced by a machine repeating an action over and over again.


After generating these tiny prints, I decided to digitise and blow up a set of 4 of them. I was originally only going to blow up one of them, but the output was better than I expected, almost resembling the fronds of a palm, with an organic form.


Initially I was going to get a normal photographic paper print when I happened to see at the printers how well the metallic prints seemed to bring out the colour, giving it more three-dimensionality. So... I decided to try doing my print on metallic and I love it!


The work is currently at ArtScience Museum, Level 4 until 9 March 2020. There wasn't an opening event due to coronavirus cancellations. But come and see it when you can and let me know what you think of them. And as for next steps, I think I will build a bigger XY plotter!...


SUPER–TRAJECTORY: Life in Motion
20 February to 8 March | 10am–7pm
ArtScience Galleries, Level 4
Free admission


SUPER–TRAJECTORY: Life in Motion is a presentation of new media artworks from Taiwan and Singapore that reflects on the human experience in an era of instantaneity, transformation and conflict, where speed is the new scale.

Through a programme of installations and screenings, artists investigate the artistic and cultural consequences of new technologies, reflecting on what it means to be making art in an accelerating, media-influenced world.
The artists, in different ways, explore a digital world that generates itself and our longing for material qualities and tactile connections in our lives. We see Chih-Ming Fan, Ong Kian Peng and Syntfarm employ computational algorithms as interventions to the present moment as we are confronted with new realities; while Debbie Ding, Charles Lim and Weixin Quek Chong engage with the intimacy and agency of touch in an exploration of materiality and physicality in our relationships with technologies. In the works of Cecile Chagnaud, Mangkhut, Hsin-Jen Wang and Tsan-Cheng Wu, we encounter a delicate exchange with the artists’ worlds as they consider the notion of home and memory by mapping their personal experiences against the unprecedented impact of urbanisation.

Between today’s postdigital condition and the complex yet banal realities of contemporary life, this group of works poses the question: What are the humanistic values and principles in an increasingly formatted world?
SUPER–TRAJECTORY: Life in Motion at ArtScience Museum is a collaboration with INTERーMISSION (Urich Lau and Teow Yue Han), Tamtam ART Taiwan (Vicky Yun-Ting Hung, Wei-Ming Ho and Lois Wen-Chi Wang) and 臺南市美術館 Tainan Art Museum.

Exhibiting artists include Cecile Chagnaud, Debbie Ding, Chih-Ming Fan, Charles Lim, Mangkhut (Jeremy Sharma), Ong Kian Peng, Weixin Quek Chong, Syntfarm (Andreas Schlegel and Vladimir Todorovic), Hsin-Jen Wang and Tsan-Cheng Wu.

The first iteration of SUPER–TRAJECTORY, Media/Life Out of Balance (6 October 2019 to 3 March 2020), was presented at Tainan Art Museum, setting out this cross-regional platform for contemporary and experimental media art and exchange in discourses on technology in art.

More Info on Facebook

Thursday, 26 December 2019

How to get ready for the 2063 annular solar eclipse


This morning at about 10am, George alerted me to the fact that the annular solar eclipse of our lifetime was going to be upon us presently, at 1.22pm-1.24pm SGT (Singapore Time). The next one is in 2063 and I would either be 79 years old or dead by then (cue the crying from baby Beano when she finds out that Mummies and Daddies don't live forever), so I decided that I would quickly set up a safe viewing board for Beano (and the adults).


Here's a diagram of my hacky setup...

A pinhole camera is doable but the output would be very dim and hard for a baby to see. Probably hard for adults to see too. So I decided to get some binoculars and build a simple projector with actual lenses. Benefits of living 5min from Mustafa is that I can waltz up to it at 11am and say to the man at the counter: "hello which is the best sub-$100 binoculars that you recommend???" And then go back with my awesome new binoculars and make a hacky job with some cardboard and tape, and get to a nearby hdb carpark rooftop by 1pm...

My top tip for people trying to build this in 2063 is to dispense with the tripod entirely and just hold it in your hands and lap as follows because ITS HARD TO FOCUS ON THE SUN IF YOU DON'T ACTUALLY LOOK AT IT.

I missed getting the ring moment on camera but I think got a pretty good view (and extremely safe view) of the eclipse anyway. I also pointed my preview camera at it and later when I looked I saw some refraction from the eclipse in my picture.


I don't think baby was very impressed by it (possibly because she does not yet know what is SUN or MOON or SHADOW, etc) but now I have a great pair of binoculars with which to spend hours looking at the strange things people do on the streets of Jalan Besar / Little India when they think they are not being looked at...

Friday, 20 December 2019

Playing around with Jupyter Notebook, Sketch RNN & Neural Style Transfer


This week as part of my work I went to a 2-day crash course in Tensorflow for NLP, which is admittedly ridiculous because (a) 2-days? what can one accomplish in 2 days? would we not be better off slowly studying ML via a mooc on our phones? or the Google Machine Learning Crash Course? and the official Tensorflow tutorials? (b) I am struggling with both the practical side (I have absolutely no maths foundation) and theorectical side (I don't even understand regression models, but, I mean, do I need to understand regression models anyway?)

Which then begs the question: DO I REALLY NEED TO PEEK INSIDE THE BLACK BOX IN MY LINE OF WORK?

Or, WHAT IS MY LINE OF WORK ANYWAY? And how much technical understanding do I really need to have?

Now I obviously don't feel like I'm in any position to design the innards of the black box myself, but I'd like to be the person who gathers up all the inputs, preprocesses it, and stuffs it through the black box myself, so as to obtain an interesting and meaningful output (basically I'm more interested in the problem framing). But existential crises aside, this post is to gather up all my thoughts, outputs (ironically unrelated to the course I was at, but this is a personal blog anyway), and relevant links for the time being (pfftshaw, with the rate at which things are going they'll probably be outdated by 2020...)

Jupyter Notebook


Jupyter Notebook is the wiki I wish I always had! Usually when working in Python you're always in the shell or editor and I make my wiki notes in a linear fashion to recount the story of what I was doing (in case I want to revisit my work at a later point). For the purposes of learning I find it most useful to think of it as a linear narrative.

Jupyter is the new shell where you can do precisely that - write a linear narrative of what you think you were doing - alongside the cells of your code that you run. Its generally quite easy to set up Jupyter notebook via Anaconda which will install both Python and Jupyter Notebook and then you can paste the link from terminal into your browser.


I could have embedded my notebooks instead of screenshotting it but I ain't gonna share my notebooks cos these are just silly "HELLO WORLD" type tings...

Let's say you don't want to run it on local environment. That's fine too because you can use the cloud version - Google Colab. You can work on the cloud, upload files and load files in from Google Drive. You can work on it at home with one computer and then go into the office and work on it with another computer and a different OS. You can write in Markdown and format equations using LaTeX.

As an interactive notebook there are so many opportunities for storytelling and documentation with Jupyter Notebook. And if you like things to be pretty, you can style both the notebook itself or style the outputs with css.

Sketch RNN


I followed the Sketch RNN tutorial on Google Colab to produce the following Bus turning into a Cat...


Love the Quick Draw project because it is so much like the story I often tell about how I used to quiz people about what they thought a scallop looked like because I realised many Singaporeans think that it is a cake instead of a shellfish with a "scalloped edge shell".

I love the shonky-ness of the drawings and I kinda wanna make my own data set to add to it, and perhaps the shonky-ness is something I can amplify with my extremely shonky usb drawing robot which could use the vector data to make some ultra shonky drawings in the flesh.

Now that I have accidentally wrote the word shonky so many times I feel I should define what I mean: "shonky" means that the output is of dubious quality, and for me the term also has a certain comedic impact, like an Eraserhead baby moment which ends in nervous laughter. (Another word I like to use interchangeably with "shonky" is the Malay word "koyak" which I also imagine to have comedic impact)


Eg: When Tree Trunks explodes unexpectedly...

Neural Style Transfer


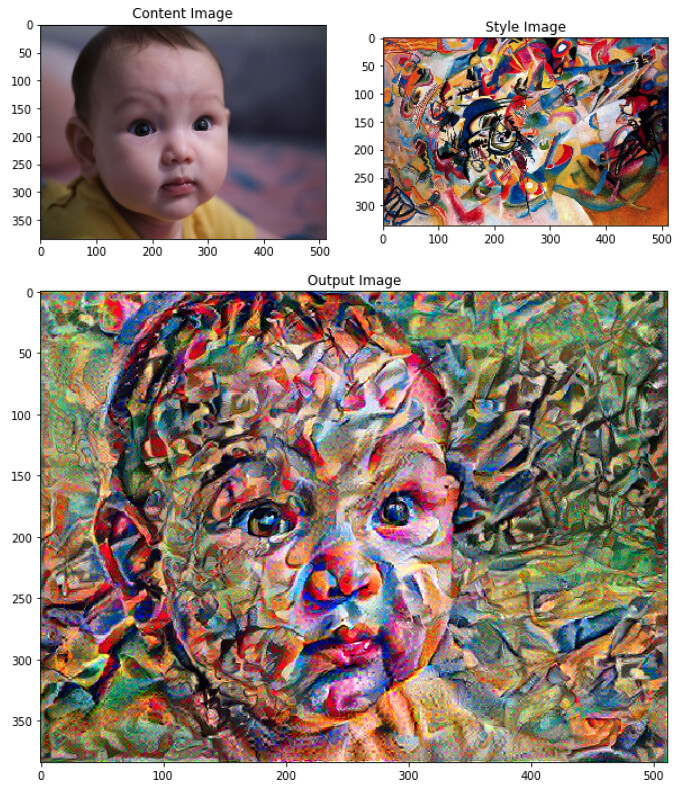
I followed the Neural Style Transfer using tensorflow and keras tutorial on Google Colab to produce the following:

Beano x Hokusai
Neural Style Transfer with Eager Execution - Colab3

Beano x Van Gogh's Starry Night
Neural Style Transfer with Eager Execution - Colab4

Beano x Kandinsky
Neural Style Transfer with Eager Execution - Colab5

Beano x Ghost in the Shell
Copy of Neural Style Transfer with Eager Execution gots

Beano x Haring
Copy of Neural Style Transfer with Eager Execution_haring

Beano x Tiger
Copy of Neural Style Transfer with Eager Execution_tiger

Beano x Klee
Copy of Neural Style Transfer with Eager Execution

How does this work? In the paper it describes how you can try to find out what is the style of an image by including feature correlations of multiple layers in order to obtain a multi-scale representation of the original input image, thus capturing its texture information but not the global arrangement. The higher levels capture the high-level content in terms of objects and their arrangement in the input image but do not constrain the exact pixel values of the reconstruction.


Image Source: "A Neural Algorithm of Artistic Style" by Leon A. Gatys, Alexander S. Ecker, Matthias Bethge