Tuesday, 26 May 2020

Domestic Life in the time of Coronavirus: Sprouting Seeds, Mason Jars & Food Prep, and Not Exactly Bullet Journalling & Productivity


This blog has been a little quiet since the circuit breaker in Singapore began I'm a person with too many jobs at the moment. I've been (full-time) teaching all my classes (say hello to 3-4 hour practicals via Zoom!?!) and taking a part-time Specialist Diploma (just because it is circuit breaker hasn't meant the essay deadlines were delayed!), whilst also full-time taking care of the baby human Bean (childcare centres all closed and grandparents advised not to travel over for childcare!!), which has left me with nearly no time to do any of the normal debbiethings I would usually get up to.

Maybe to build a little momentum and to get the ball rolling on this dusty old blog again, here's a little documentation about some of domestic/productivity-related debbiethings I DID do during circuit breaker in the stolen moments....


1. Sprouting Seeds: Growing Mung Bean Sprouts at home


It seems everyone's newest urban growing craze during Singapore's lockdown circuit breaker is Mung Bean Sprouts and yes... even I too have been growing them. I've grown some sub-par sprouts or weird looking sprouts in the past - we forget how used we are to seeing the commercial "taugeh" sprouts being all pasty white and yellow, and somehow by allowing the sprouts to turn green by giving them some sunlight also changes how they grow and how they taste. Growing some fast sprouts for consumption is different from growing bean plants, and websites online all anedoctally point to a few things you can do to improve the quality of your sprouts:
  1. Grow them in total darkness (Under a truly opaque cloth. A hankerchief will not suffice to keep the light out. I used an dark coloured pillowcase folded over twice and draped it over the beans.)
  2. Change their water at least twice a day.
  3. Avoid disturbing the beans too much (Somehow they grow better when they get to really establish their roots)
Now its not absolutely necessary, but I also got this microgreen tray which has these micropores which is supposed to enable a more even distribution of the microgreen seeds (although the mung bean itself is bigger), and which has two half trays which makes it easier to remove and change the water, and allows for planting two different seeds at the same time with different sowing time. (I'm just waiting to get some more microgreen seeds from local farms to see if there's a microgreen that we will enjoy eating, so later in the year I'll report back on the microgreens...)
 

Presoak the beans overnight in a bowl, covered by a cloth. Here I measured out 1/4 cup of mung beans. On hindsight... I probably needed half of that. These aren't any fancy mung beans, just the cheap Redmart brand for everyday cooking.
 

After soaking overnight and skimming off the obvious split beans, the remaining beans were scattered over the tray and water poured in until it touched the mat. 1/4 cup of soaked mung beans fit almost exactly into the two trays.


The beans then were rinsed twice a day and left to grow under cover of darkness until they looked about ready to harvest on Day 5.
 

Here the human Bean inspects the Beans.
 

The roots are clean so we ate them roots and all. I only rinsed it several times in order to remove the green bean husks which are a little less palatable, texturally, but not entirely inedible.
 

Finally the cleaned sprouts are ready to go in any dish you want. This made enough for about 3-4 meals of sprouts, so next time I'll grow fewer beans at one go as its nicer to eat the sprouts fresh.
   

The sprouts were blanched in boiling water for 1 min and then thrown into a big metal bowl of ice water to stop them from overcooking. Then they can be used in any recipe. I loosely used Maangchi's Sukjunamul Muchim recipe to make a sprout dish to go with a big pot of Doenjang jjigae, which was also loosely thrown together with bits and bobs around the house.
 

2. Mason Jars: How I make Overnight oats and prep common ingredients ahead of time

I became slightly obsessed with mason jars after trying to find a replacement lid for a regular jam jar that I had around the house and so I wondered about what constituted a standard jam jar lid size. I measured the exterior dimensions of the jar I had and it was 70mm - turns out that this is the size of a "regular" mason jar. And there's another common size that I find myself drawn to even more - the wide mouth. Looks like a drinking glass, but is microwaveable and oven safe? SIGN ME UP! Making overnight oats was the solution to my morning routine; I find that I can no longer skip breakfast without becoming faint and HANGRY, but often I don't have enough time to prepare food for myself when I have to run a 8am or 9am class AND also feed the Bean AND change her nappies AND check work email. So... Jars! JARS! JARS! George seems to think I've reached new instagrammable heights of food-prep-hipsterdom with my functional food prep so here are some pictures that he ended up making me take.


These are 1-pint jars (476ml) and just the right size for a portion of food (they are also the right size to pour a nice cold drink into!). I got 12 jars online for about S$48 and I also got a stack of both regular and wide mouth plastic lids for about S$5. The Ball jars themselves are definitely oven safe and microwave safe as they were meant for preserving jams, so if you buy random jars online check to make sure they are suitable for such reheating use. (If you dig a little deeper online you'll find a whole lot of alternative mason jar lids which work as fermenters, sprouters, graters, juicers, etc...)


The overnight oats recipe that I made up to my preference and have been using for some time now is this:


Debbie's Breakfast


1/2 cup oats
1 tbsp chia seeds
1 tbsp flaxseed meal
1 tsp moringa leaf powder
1 tbsp dried cranberries
1 tbsp dried mulberries
2 dried apricots, cut into small pieces
3/4 cup milk a squirt of honey


When I am eating it, I throw in about a 1/4 cup more of milk and sometimes I throw in some frozen mango pieces, or frozen berries at the last minute, but I try not to leave the fruit in for too long (ie: i don't add it in at prep time) because they can get a little weird and funky in there, like how fruit tastes when it has been allowed to sit in a wet plate for too long. Its like a dessert, and I didn't think I'd be eating this so often since I have a savoury tooth and not a sweet tooth at all (I have eaten savoury breakfasts for most of my life), but I was hoping that oats would aid my milk production (since the Bean is still breastfed) and turns out that overnight oats SAVES TIME!


I also use the jars for advance meal prep at the moment. I like to make a big batch of caramelised onions at the start of the work week (2 jars worth, or a 2kg bag) and then stuff them into the fridge so that during the week whenever I make a quick meal or pasta I can just throw a handful of onions in and it immediately makes it feel even more like a meal.


Debbie's 15min Lunch


Ingredients
80g of vermicelli pasta
some bacon
4 cloves garlic
handful of baby spinach
smoked paprika
caramelised onions
caramelised red peppers or any other cooked vegetable in the house
and some leftover chilli flakes from when George last bought PIZZA

Steps
  1. Boil of a pot of water with 1 heaped teaspoon of salt
  2. Fry the bacon in some oil at very low heat to render the fat
  3. Slice the garlic thinly and add to the oil. Heat should be so low such that only small bubbles appear on the edge of the sliced garlic.
  4. Add paprika and chilli flakes to the oil.
  5. Cook the pasta according to the timing on packet, in my case it is 6 minutes. Set the timer for 5 min.
  6. Add in the onions and any vegetables to the oil. Wilt the spinach in the pan.
  7. A minute before the pasta is done, transfer the pasta and a big splash of pasta water into the pan.
  8. Allow for everything to cook down until the pasta water and everything is absorbed back into the pasta (usually 1-2 min more)
Lunch in 15 minutes!


3. Not Exactly Bullet Journalling: Improving my To Do List format

Longtime readers of this blog (who on earth is my audience? haha. hello friends???) will know that I am not so secretly big on GTD/PRODUCTIVITY. Sometimes George thinks I like doing work because it must be that I ascribe some kind of moral value to hardworking (a la protestant work ethic) but honestly I like working because... I enjoy it! I enjoy keeping busy and fiddling with things and doing stuff. I enjoy toiling away at things. (Oh. Maybe that is where Beano is getting her inexplicable drive to EXERCISE NONSTOP).


During my maternity leave I had a phase in which I read all about bullet journaling. I also became aware that there's a huge cottage industy of people and instagrammers banging on about their #bujo designs although none of them look particularly productive to me, and if its not productive I don't really need it. My notebook is like a cup I can empty my brain out into so I don't have to hold all that stuff inside my brain where it gets all crowded. I don't really need my notebook to be neat, but I liked being able to physically cross off items on a list and review what I managed to complete at the end of the day (a sort of pat-yourself-on-the-back if you managed to do most of what you planned. Previously, I would write items in a list and then cross them out, which made them quite unreadable. I ain't got time to document everything in a bullet journal, but I have incorporated the format of the checkbox into my everyday To-do list format. I now draw a square and cross out only within the square when the task is done. I also draw an arrow to indicate if the task is carried over to the next page.
  Whether or not you believe in willpower being a finite or infinite resource, I do find that removing obstacles to my morning also helps get things going every morning (especially when I have to rush to feed baby, myself, and start my 8/9am class):
  • Getting hydrated in the morning - Before I go to bed I set out empty mugs with my tea and spoon, so I only need to add hot water the next morning. Often one needs to muster the will to do this small thing for oneself...
  • Pre-measured baby feeds - Before I go to bed, I measure out all of the bits that will go into Bean's first feed of the next day. I've still been using all the travel containers to premeasure the oatmeal and formula for mixing into oatmeal feeds. It saves a bit of time when I'm rushing and multitasking.
  • Drafting emails on Google Keep - this is my scratch pad where I draft out bits of emails. It is quickly available on all my computers and devices so I can paste completed emails in quickly at the start of the workday. I don't send work emails after work hours because I think its important to observe the working day (and it is well-known that people will mainly check their email in the morning and so if you want a quick reply, you'll want your email to come in right on top of their inbox for about 10am)...


In the next post, I swear I will finally complete my series on House Renovations in time for the 1 year anniversary of having moved into this flat!

Sunday, 5 April 2020

Standards for N95 Respirators and Surgical Masks

I'm not a medical professional, but as a mother of a young baby and daughter of parents who are over 60 years old, I ended up doing so much reading up on masks/respirators that I thought I may as well collate my thoughts together in a post like this which might be useful for others to understand the standards for respirators and masks, and the difference between disposable dust masks, surgical masks, and N95 respirators. [Note: this post was many days in the making because I've been caring for a small and very wriggly baby, so do note that I started writing this post before PM Lee announced the 'circuit-breaker' in Singapore. I expect that guidances may change regarding masks over time...]

It is rather long, so here is a summary so you can skip to the specific sections quickly...

Pitta Masks and PM2.5 pollution masks do not filter for virus particles
The difference between Masks and Respirators
N95 Respirators Standards - US Standards (NIOSH) & EU Standards (CE)
Surgical Mask Standards (EN 14683+AC Medical face masks) vs Non-medical Filtering half masks Standards (EN149:2001+A1:2009)


Pitta Masks and PM2.5 pollution masks do not filter for virus particles

Recently I made the decision to withdraw baby from infantcare (having foreseen that there would be a long period where I would be asked to work from home - that prediction has now been confirmed as reality) and as a result my parents have been coming to my house to care for baby whilst I work from home. Because this meant that my parents were exposed more than me because of their transit from their house to ours, my mother expressed worry about taking Grab. So I decided to buy some masks first and foremost for my 60+ year old parents who are in the most vulnerable category.

Two months ago, my very crafty and industrious mother tried to sew some reusable masks out of cotton - but I just was not convinced that this was safe. Even from my layman perspective, how could a cloth filter the microscopic particles of a virus? So I went online and randomly bought a packet of the first aesthetically pleasing mask I saw online - the Japanese Pitta mask. But since then, I have read the fine print: Pitta Masks cannot filter tiny virus particles. Online you can find people who have done tests on the Pitta masks and found that they "captured an astounding 0% of 0.3-micron particles".
😱
To be fair, the Pitta mask manufacturer does not advertise it for virus protection. It is simply that online sellers are putting it up unscrupulously without mentioning the fact of the matter that PM2.5 is not enough.


Image source: https://smartairfilters.com/en/blog/coronavirus-pollution-masks-n95-surgical-mask/
Read more: https://smartairfilters.com/en/blog/pitta-masks-protect-capture-coronavirus-virus/


The difference between Masks and Respirators

Having ruled out Pitta masks, I started trying to understand if I should look for Surgical Masks and Respirators.

In a 3M document I found online by their "3M Subject Matter Expert – Asia Pacific Region", they state the different purposes of the masks vs respirators. It also says that "for any airborne particulate contamination such as an outbreak of PM2.5 / PM 10/ Severe Acute Respiratory Syndrome (SARS), Avian Flu, Ebola Virus etc. only respirators and not Masks, should be used to safeguard oneself from getting any kind of respiratory diseases."


Respirators = designed to protect you from the environment
Masks = designed to protect the environment from you


N95 Respirators Standards - US Standards (NIOSH) & EU Standards (CE)

WHAT DOES A LESS THAN 0.1 MICRON PARTICLE LOOK LIKE? Does a mask really filter a less than 0.1 micron particle? Sadly, it seems that figuring out which mask can really filter such a tiny particle is impossible to us alone to judge; it is entirely down to a lab test - so you could say then that it is down to the various 'standards' that the batch of masks have to meet when they are tested in a lab. So this it led me to find out - who tests the masks to make sure they are up to the standard they say they are?

US Standard:
N95 Respirator [Filters at least 95% of airborne particles]
N99 Respirator [Filters at least 99% of airborne particles]
N100 Respirator [Filters at least 99.7% of airborne particles]
IS IT A REAL NIOSH TC-APPROVED CERT NUMBER? You can check here: https://wwwn.cdc.gov/niosh-cel/.

European Standard:
FFP1 Respirator [Filters at least 80% of airborne particle]
FFP2 Respirator [Filters at least 94% of airborne particles]
FFP3 Respirator Filters at least 99% of airborne particles]
Check for CE cert by looking at the cert's issuing body. Unfortunately, there isn't a centralised data base you can dial it into. For more, read here at CE-Check Support. But, I have found that some of the certifying bodies have got sites where you can enter the cert number to verify.

Besides those standards, there is the Chinese KN95 and Korean KF94 which are supposed to be equivalent in standard to N95. How do we verify them? Is there any way to verify them? I don't really know. ¯\_(ツ)_/¯

This is where it got murky... So I wanted to buy some working N95 Respirators. I dialed in "N95" on Qoo10, Lazada, Shopee and ezbuy. Here's an example of the first respirator with dodgy papers which I found on Qoo10 from the seller "Collectible Haven":


I took it one step further. I took the number they posted and checked it with the Standards body for NIOSH. THE CERT NUMBER THEY PROVIDED WAS NOT FOR THEIR COMPANY OR THE PRODUCT! It did have the same product number 1200F though, but I do feel deceived.


There were several other similar examples online but I won't go through them. You can do the sleuthing yourself if you are concerned. But here is an example where I did buy the mask, and it checked out correctly.


Here's an original box of 3M 8210 masks which on the list of N95 masks from the company, along with a diagram of how to tell if the mask is an actual N95 mask.


Source: How to check the NIOSH marking on the mask (ie: the N95 standard)

After discovering that several masks online that provided "documentation" of the masks which was fake, I decided to see what really constituted a surgical mask. They've been saying that surgical masks are what you need to wear, but that there were many cases reported in the media where people bought expensive 'surgical masks' which were very thin or suspicious. The Health Sciences Authority regulates the importation of surgical masks, and their website (currenly down) had stated that there was a difference between standard face masks (paper or cloth) and surgical masks (medical product, Bacterial filtration efficiency above 95%*).


Surgical Mask Standards (EN 14683+AC Medical face masks) vs Non-medical Filtering half masks (EN149:2001+A1:2009)


Some days back, I preemptively placed an order for what I thought were surgical masks in case we needed some.


These were the masks I ordered on Shopee from miluvs.sg


miluvs.sg posted a screenshot of the cert

These masks said they had a CE mark which I also went back to the original agency to cross-verify. Really strange to go to the effort to see if it was true, but I did and on the http://entecerma.it/ website (a weird marketing-oriented platform which helps foreign/chinese companies bring products to European markets through CE and other certifications) if you dial in the code from the cert - truly the certification comes up as authentic.

But at the time I didn't check what device they were certifying for. What is "EN149:2001+A1:2009"? If you search for the original definition of the standard, this is for Respiratory protective devices: Filtering half masks to protect against particles. Which translated means it is a dust mask not a surgical mask. For a surgical mask, the European standard is "EN 14683+AC" - Medical face masks.


Source: miluvs.sg on Shopee

Again, this wasn't false advertising on this seller's part on Shopee. They did not say it was a surgical mask / medical product. I saw the picture of the mask and I personally assumed it was a surgical mask but in fact it is only a dust mask. A high quality, authentically tested and CE marked dust mask. Fair enough to them.

What is more unclear is that there are actually many sellers who DO sell their product as a SURGICAL MASK with CE mark but then the certs they posted show it is not a normal disposable face mask or some just posted nonsense. Here are 3 different examples (but there are countless more examples of this online)

Eg: Weilan777 on qoo10 - "surgical mask" with disposable face mask cert


Eg: OurFirstStore on lazada - "surgical mask" with cert for their machinery not the mask itself


Eg: Boslun on lazada - "surgical mask" with cert for different product


Did the sellers just assume that people would just glaze over looking at the certs and assume it was all good? You could say, "who cares about standards? just get the masks to the people quickly!" but then if you are buying this to protect a loved one, you don't want to feel like you've been deceived into buying it, especially when the masks are being sold at increasingly cut-throat prices.


(There is also the question in my mind: is it ethical for me to be buying masks when there is a shortage in other countries? I acknowledge the privilege that I have to be in a comfortable financial position to purchase masks/respirators in Singapore where it is very readily sold on many consumer platforms - and also to be in a position to help others. What about people who can't afford masks, or who don't have a good home environment to spend the lockdown in? Since I am not in a position to volunteer, I looked into the organisations who are helping those who would be in need during covid-19. If you can, do consider giving to these groups:

AWARE - Vulnerable Women's Fund: The COVID-19 pandemic underscores the already stark inequalities experienced by women in areas such as unemployment, housing, caregiving and domestic violence. This March, AWARE received 619 calls - our highest-ever number of monthly calls - with many callers dealing with emotional and psychological distress, violence and abuse. We need your help to ensure that we can continue to provide our services during this period, to aid these women in crisis.

Migrant Workers' Assistance Fund: The assistance fund aims to provide emergency humanitarian assistance to distressed migrant workers. The assistance offered ranges from emergency shelter, daily essentials and basic sustenance needs to employment-related issues such as salary arrears. In the event where the migrant workers tragically lose their lives, the MWAF may also provide their next-of-kin with monetary assistance or in kind. The funds collected from our previous fund-raising activities have benefitted many distressed workers and helped them return to their home country. To continue to provide emergency humanitarian assistance and reach out to more migrant workers, who contribute to our economy.

Friday, 6 March 2020

Quick things to do in Blender: Video Editing, Bake Sound to F-curves, VR/3D Storyboarding, Compositing 3D model into photo, and Motion Tracking

I've used (and taught) Blender quite intensively for a couple years now but I haven't really mined all its possibilities yet, and even today when I watch different staff and students work in it I still pick up new things from time to time. My selection criteria for these features is that: YES you could conceivably do all of these, even with just 5 minutes to spare and you are perched on the edge of the bed with your laptop and mouse, half-expecting baby to wake up at any moment...

Things you can do rather quickly in Blender:
Simple Video Editing
Bake Sound to F-curves
Simple Compositing of 3D model into photo
3D/360 Illustration draft with Grease Pencil
Motion Tracking to composite a 3D model into a Video

1. Edit a simple video with simple edits, cropping, overlays, audio, etc in very little time

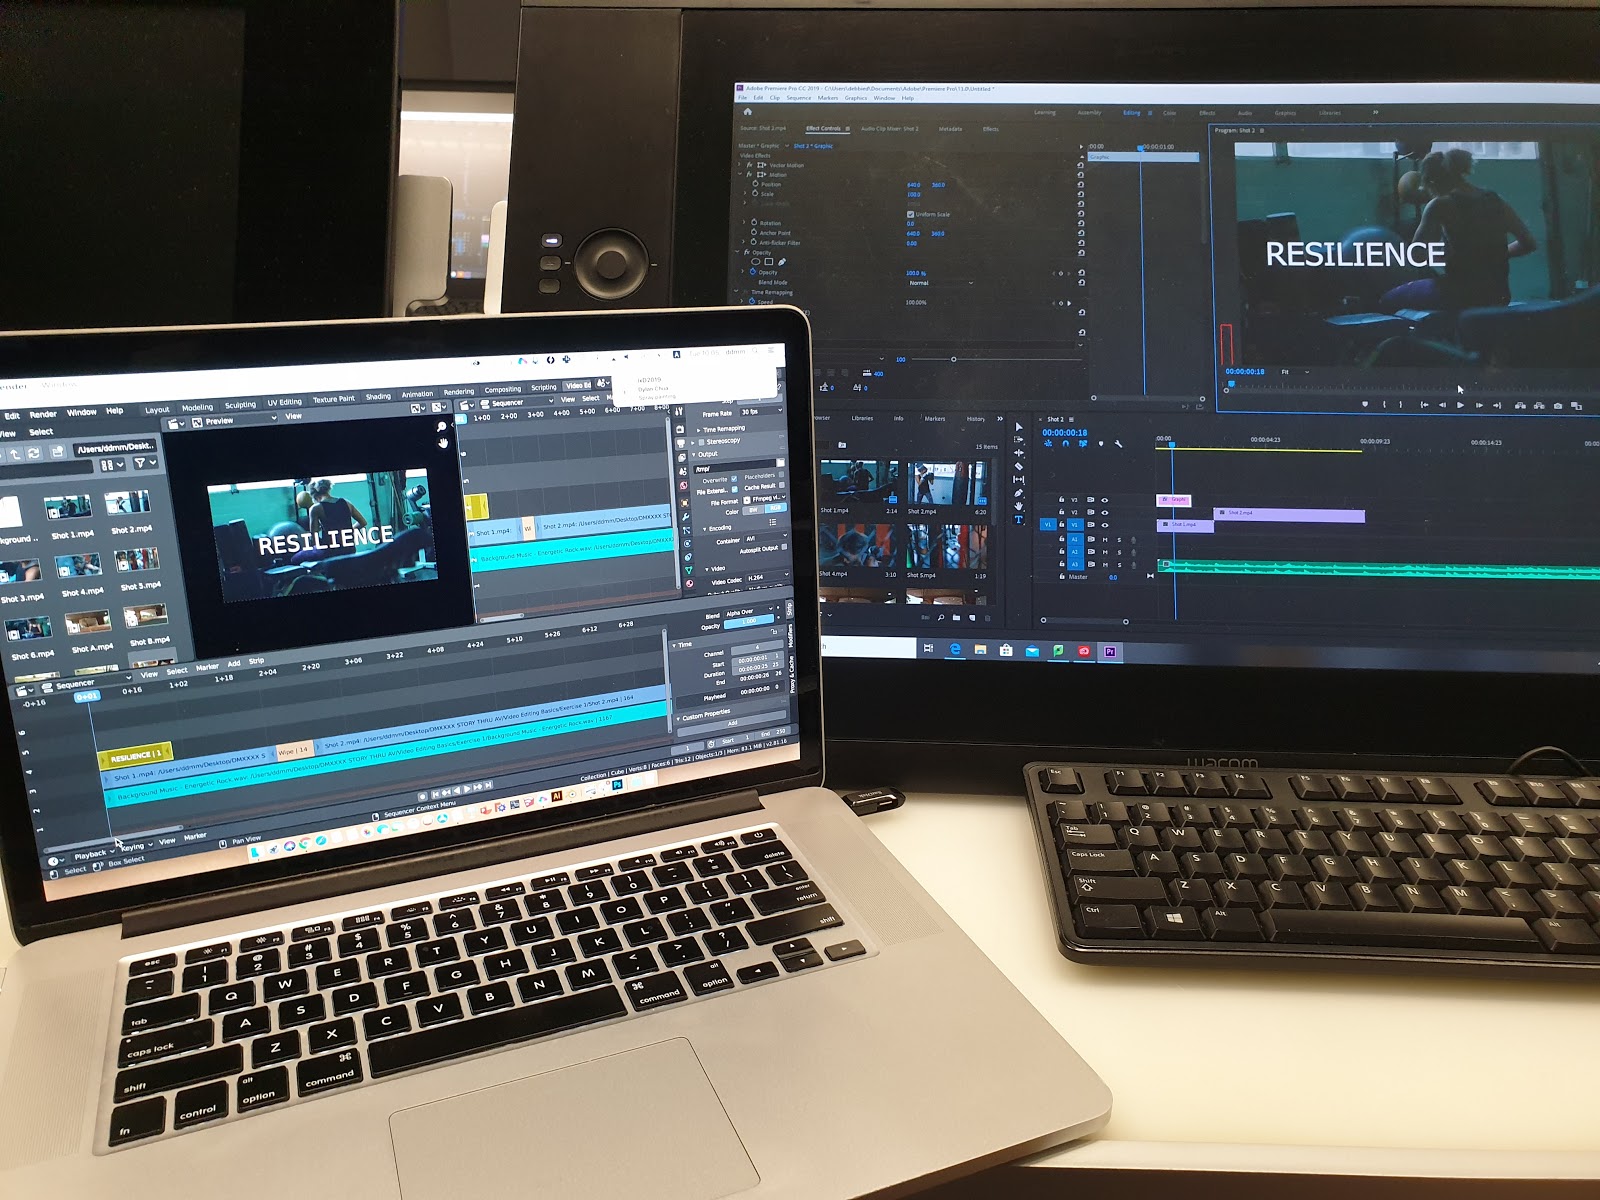
Earlier in March I attended a training but because I'm a completer finisher sort of person I ended up doing the training material on two programs simultaneously just to see if Blender could do everything Premiere could do. It turns out that YES you can do video editing in Blender and it is even faster and simpler to do it than in Premiere! The interface looks very very similar to Premiere actually and if you go into the Video Editing view there is really no excuse for having any UI related issues because the interface is just so easy now!

Features you might need like text overlay, image overlay, offset, cropping, transitions, fade in fade out, panning audio, compositing, motion tracking - all of them are possible in Blender! I think might use this for my next video edit.


2. Bake Sound to F-curves


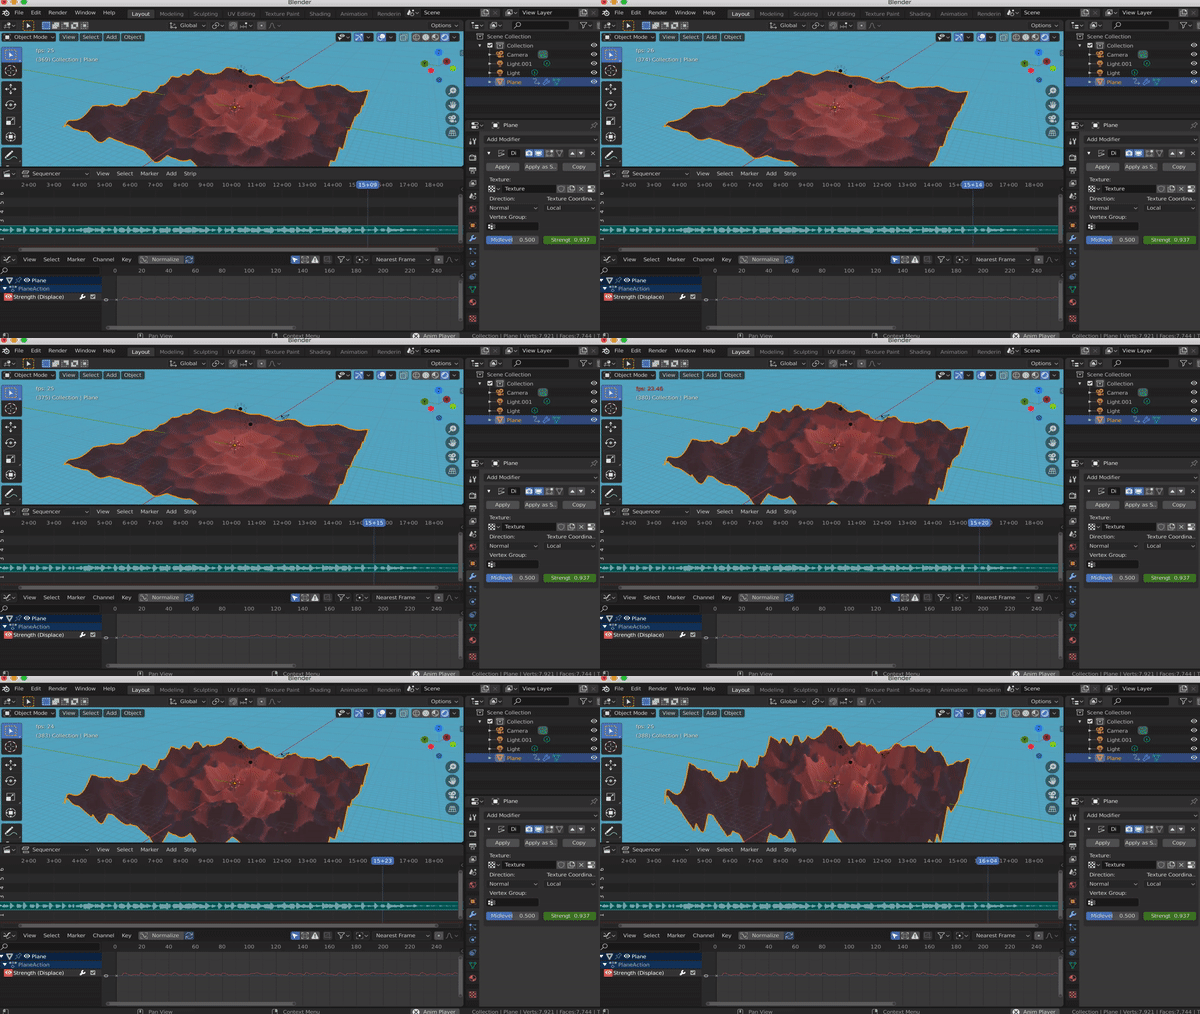
F-curve refers to the curve of the interpolation between two animated properties or keyframes. Interpolation has modes (linear, constant, bezier) and it has easing equations (linear, quadratic, cubic, exponential, etc), and stuff like that. But the funny feature in blender is the ability to bake a sound as the F-curve, or to make the sound wave the F-curve, such that your animation pulses along with the audio wave.

3. Do a sketch/storyboard for VR/360 or 3D illustration with the grease pencil

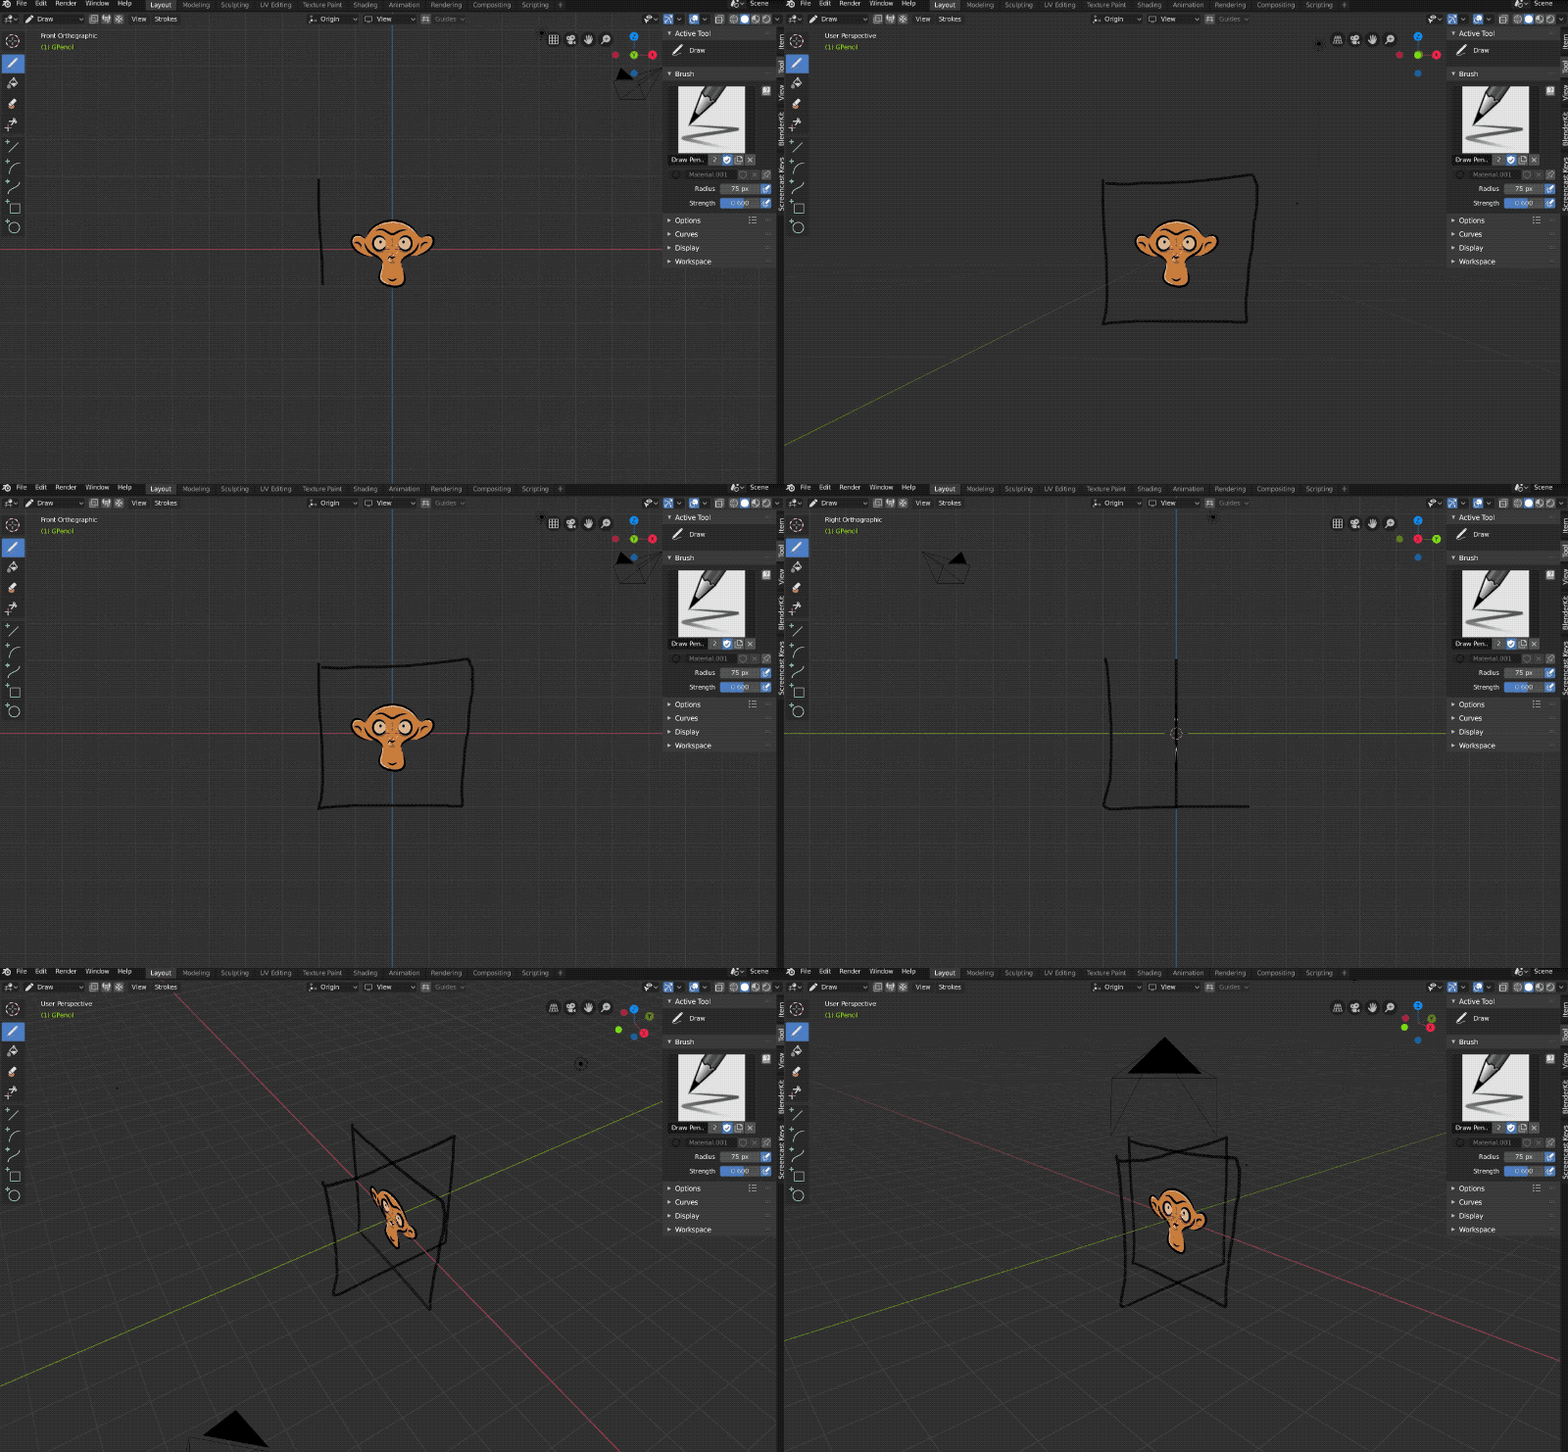
Personally I don't use this quite enough but the grease pencil is super handy for making some rough sketches or even storyboard before you do an illustration work. For example, I saw a interesting video in which someone used the grease pencil to good effect to do a storyboard for a 360 work here:


You create an empty grease pencil mesh (Shift-A) and then go into the "Draw" mode. You can only draw on the flat image plane that you are facing. But after you draw it, you can move, rotate, and scale the grease pencil drawing at will and move it all around the scene. Many possibilities!


4. Composite a 3D model into a Photo (the simple way)


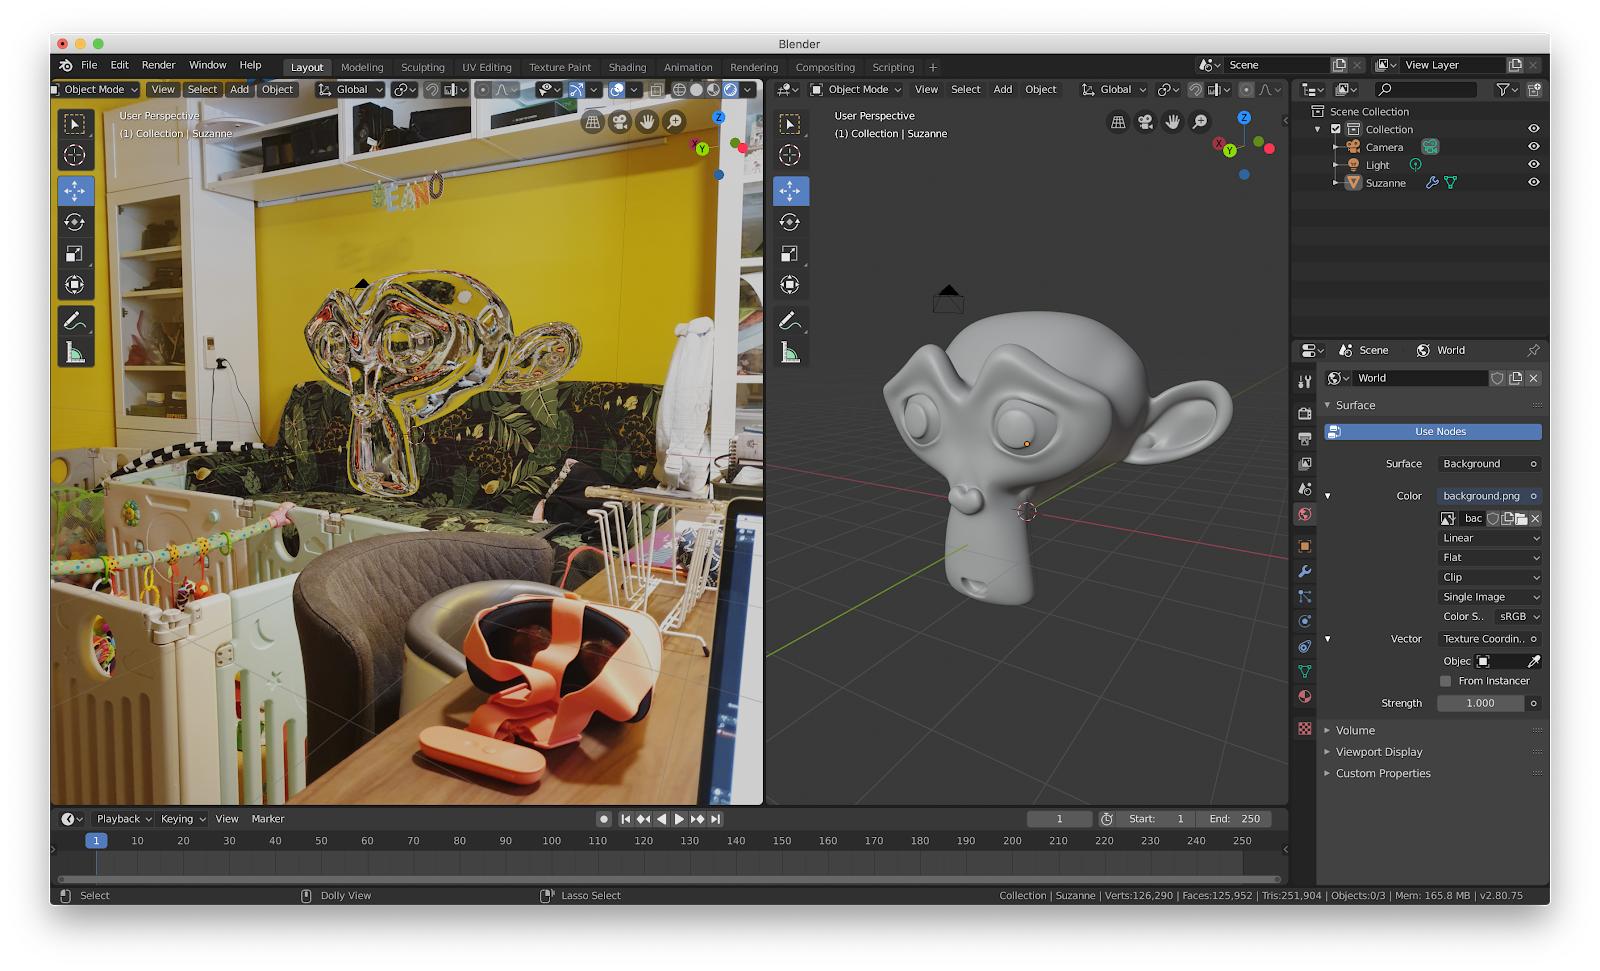
Somehow it got even easier and easier. You can set the world image background's vector texture coordinate to "window" and when you look at the Render viewport your object is now in the world with all the colour and light from the background image itself. Works if you only had 5 minutes before the baby was about to wake up and you wanted something super simple. :-D

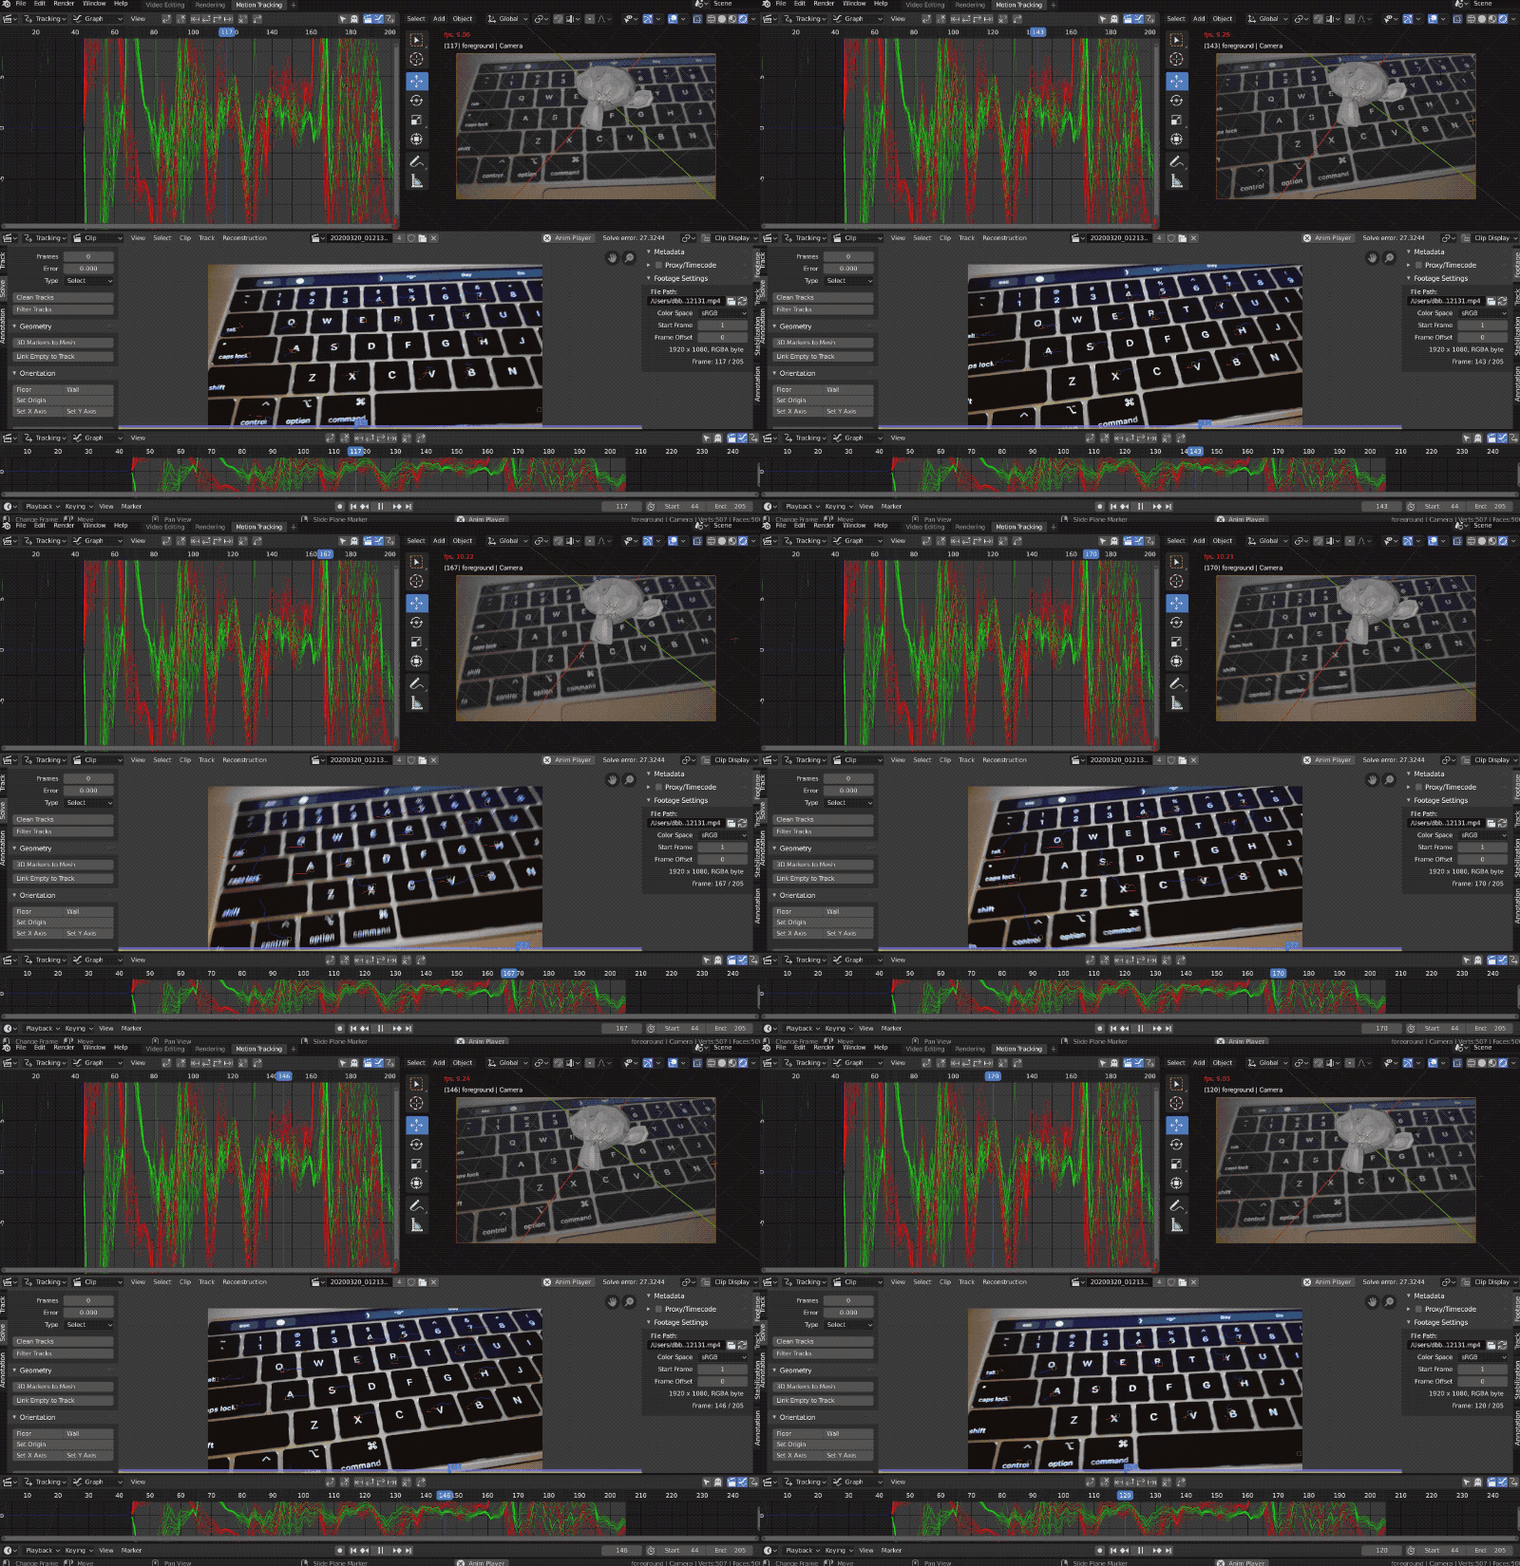
5. Motion Tracking to composite a 3D model into a Video


I decided to sit down and spend a few minutes trying out camera tracking which I've always known was a feature. Can you do it in a few minutes? Well yes, in the sense that Blender can do most of the legwork for you with camera solve but you'll need to spend some quality time editing the tracks for best effect (especially for correct rotation). Above is an example of a terrible solve.... but it kinda works!

Sunday, 23 February 2020

The Kappa's Izakaya: 360° Illustration Process


Recently I worked on a 360° illustration of an Izakaya in Daryl Qilin Yam's Kappa Quartet and I was asked if I could share a bit more about the process of doing such an illustration.

Artistic disclaimer: It just so happened that I watched a lot of Midnight Diner at the time when I was doing this illustration, so those spaces were definitely in my mind's eye. There was also the show Samurai Gourmet which was a bit tiresome to watch, but had a few good shots of a traditional izakaya too. Alas, although I have visited Tokyo several times before, at this point I haven't really been to a bar or izakaya in some years now...


From "Midnight Diner: Tokyo Stories"


From "Samurai Gourmet"

Some things I realised from these portraits of izakayas is that when in doubt on how to fill the bar space, you can put stacks of tiny crockery or cover it up with a cupboard!


I even made a little crackleware... not that the detail is visible in the final render

Another disclaimer: Where 3D modelling is concerned, I mainly design spaces and architectural/interior renders and I'm not a character designer! This will probably be apparent to people who actually do proper animation / character design because here I chose to render all the other people in the scene in this weird white low-poly form. Personally I thought it a good fix for my weakness and also that it kinda worked for this 'horror' piece...

Initially I thought that I would actually try to do the entire drawing by hand because I have actually enjoyed doing similar illustrations entirely by hand in the past - especially with lens distorsion like this:


2 illustrations from the set of 4 that I was commissioned to do for the Commuting Reader

I usually work out a lot of the alignment for this kind of illustration by doing a 3d model using a fisheye or panoramic lens. After arranging white blocks in the space and rendering it out, I just use those lines in the render as perspective reference for my drawing.


Example: this plain equirectangular render with no materials...

And for all other details that you need to fill in by hand, you can rely on an equirectangular grid (here is a link to an equirectangular grid by David Swart that you can use as a template) and think of it as a 4 point perspective drawing as so:


Here's a 4 hour sketch I made using the grid for the fun of it in 2018...
(Back when I had a lot of free time huh)


Problem right now is that feeding and caring for Beano made it extraordinarily difficult for me to be able to use the tablet or cintiq. If left to her own devices, she wants to pull on all the type-c cables and gnaw on my stylus and then slap my cintiq screen! Attempts to set up my workstation in the bedroom so I can use the cintiq when she's asleep have failed in baby safety. In fact I've more or less resigned myself to the fact that spending time with the tablet is impossible now - WHO WANTS TO BUY A MEDIUM WACOM AND/OR A CINTIQ PRO IN EXCELLENT CONDITION??? - and I've had to streamline my time spent designing, thinking of the fastest way to get the visual output. Hours spent doing digital painting like in the old days? Not happening anymore. A blender render is all I can muster now, which is great because whilst I feed and entertain Beano, I can easily set a render going so that I feel as if my illustration is partly doing itself whilst I'm busy...


I also use a renderfarm to speed things up a bit and I usually do a smaller resolution render to check that things are alright before doing the full size. At the 50% of the resolution I wanted it cost about 40-60 US cents (0.85 SGD) for each one. For the final render at 100% resolution and twice the samples, it cost about 4 USD (5.60 SGD).


I don't know how most people do the next step but I usually go through a process of annotating my renders and then ticking them off in Monosnap through as I do the edits:


Finally we end up with the base render onto which I can add faces and other details in Photoshop. I do find that adding a bit of noise (0.5%-2%) also helps make it more 'painterly' because when the render is too sharp it becomes a bit disconcerting and unreal. I also drop the file periodically into this equirectangular viewer to see if the work is shaping up correctly - usually common issues might include (1) some things in the image that seemed further away may suddenly seem extremely close to the camera view or (2) items may be blocked when you render the specific view - so some time needs to be spent finetuning the arrangement.


Render Breakdown

This was another work made possible by the Dingparents who came down to take care of Beano on the weekends so I could continue my artistic pursuits! I am grateful to have the time to continue to make my work.


Come see the final image at Textures: A Weekend of Words, at Sorta Scary Singapore Stories by Tusitala.


13 - 22 Mar
10am – 10pm
The Arts House

Textures: A Weekend of Words celebrates Singapore literature and its diverse community. No longer a solitary experience, reading becomes a shared adventure through performances, installations, and workshops that will take you on a trip through the literary worlds of local authors.

The third edition of the festival takes on the theme “These Storied Walls”. Inspired by The Arts House’s many identities as a Scotsman’s planned estate, our nation’s first parliament, and now Singapore’s literary arts centre, the walls of The Arts House have been etched with the stories of those who have walked these halls.

This year’s programming features more installations and participatory activities that invite you to go a step further — move a bit closer and look a little longer. As you discover undiscovered narratives of your own, join those who have come before and weave your story into the tapestry of The Arts House.

Textures is co-commissioned by The Arts House and #BuySingLit, and supported by National Arts Council

More about Sorta Scary Singapore Stories